Last updated on January 21st, 2013 at 03:31 pm
I first saw a Headlamp Lens Restoration Kit on late night infomercials but didn’t think much about them other than some skepticism… Hey, it was on a late night infomercial. But my truck had cloudy, yellow headlamp lenses. It didn’t matter how clean and shiny the rest of the truck was, I always saw those yellow headlights staring at me.
It got to the point I was willing to risk a few bucks just for the chance that the kit would work.
I found a 3M brand kit for $19.95. At that price I almost didn’t buy it. Twenty dollars for something I didn’t really believe would work and may actually make the lenses worse. But 3M is a name brand and, truth told, my headlamp lenses couldn’t look any worse short of taking a hammer to them. Surprise… it worked!
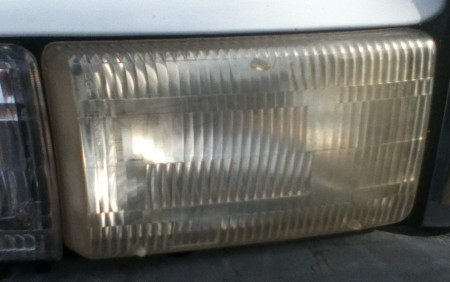
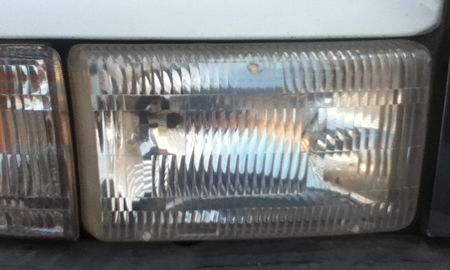
The kit comes with a small disc backing attachment for your power drill, several sanding discs of two different grits, polishing pads and polishing solution. Also included was masking tape to protect any painted surfaces surrounding the lenses. The sanding discs and polishing pads stick to the backing attachment with hook & loop. Very easy to use.
You will need a low-RPM power drill. My cordless drill met the specification in the instructions and I suspect most cordless drills would too. You will also need a couple of clean soft rags and source of clean water.
The directions were reasonably good, taking me through a logical progression of course grid, fine grit and polish. What the instructions don’t help much with is how long you should do each step. Luckily it just isn’t that big a deal.
When I started with the course grit I noticed the plastic dust from the sanding process was just as yellow as the lens looked. After a few passes over the lens the dust turned white… a good indication that I had completed the first step.
I spent about as much time doing the fine grit sanding as I did on the course and trusted that was enough.
If you spend enough time on step two then step three, polishing, goes pretty quickly. Following instructions, I used a damp cloth to check my progress. Wiping the lens with water lets you see if there are any missed scratches and gives an idea of what the lens will look like once it’s buffed clean.
Once I was satisfied the polished lens was as good as it could be, it was just a matter of cleaning and then buffing the lens with a dry cloth.
I just had to restore the headlamp lenses since the turn signal and taillight lenses still looked nearly new. How does that work? Anyway, I had enough sanding discs and polishing solution left that Fran’s #1 son Mark used the kit to restore his headlamps. Then grandson Cameron salvaged a few of the less used sanding discs and squeezed out enough solution to restore his headlamps. His car was newer so they didn’t need as much work but there was a visible improvement.
You get what you pay for. I see that Harbor Freight has a kit for $10 but it seems the kit doesn’t to include sanding discs and relies on polishing to restore the lens. That may be okay if your lenses are not as bad as mine were. But I my case, just trying to polish them back to a new look would have taken a lot more time if it worked at all.
Bottom line:
I highly recommend the 3M Lens Restoration Kit. It really does work and there is plenty of supplies to do one complete lens set on just about any vehicle or the headlamps on at least two cars.


