Hot tips for helping your RV weather the winter cold.
Author – Lynn Laymon and Linda Lee Walden for the Good Sam Club
As the days get shorter and temperatures cool, snowbirds in North America’s cold regions head south in search of warmer climates. But not everybody has the luxury of chasing the sun during winter. Some of us store our rigs away for the season, and that entails emptying the holding tanks, draining the water system and possibly adding RV antifreeze to the water lines. Of course, doing the job right is a little more involved.
Here, then, are a few tips to help your recreational vehicle make the transition from winter to spring without suffering damage that low temperatures and long storage periods can bring.
Location, Location, Location
The mercury hasn’t plummeted yet, but it’s never too early to plan for year-end storage. The first step in preparing your rig for low temperatures is finding a suitable winter home. At the top of the list is an indoor climate-controlled structure. If you’re lucky enough to have access to this type of facility and can afford the fee, jump at it. Parking your rig in a heated, sheltered environment eliminates many of the tasks that are required for winter storage.
Don’t have access to a cozy shelter? One notch down is unheated indoor storage. This eliminates the need for exterior protection, but you may still have to perform a number of winter-storage tasks to prevent damage caused by low temperatures (more on this below).
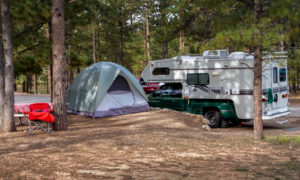
Covered outdoor storage is next, followed by parking the RV outside and unprotected. When parking outdoors, seek a location near a windbreak and avoid parking beneath trees, even if you plan to cover the unit.
Varying levels of winterization are required, depending on which storage option you choose.
Sealed for Your RV’s Protection
Regardless of where you store the RV, consider all of the things you should do to ensure the unit’s exterior is protected. First, wash the rig thoroughly and check all seams and sealants for voids or cracks. Reseal as needed with the appropriate RV sealant.
Fabric condition is critical. Extend all awnings and open pop-up campers to check that the fabric is dry, clean and in good repair. If it requires cleaning, let the fabric dry thoroughly before closing.
Also check and lubricate all door and storage compartment hinges and locks with the appropriate lubricant.
To keep the tires healthy, place a wooden plank or other insulating barrier beneath each. Inflate the tires to the maximum cold pressure listed on the sidewall and, if storing outside, protect each tire with an ultraviolet-ray-resistant cover. Wheels should be chocked.
According to most experts, it’s not necessary to remove trailer tires and store them inside or to jack up the RV to lessen the weight on the tires.
When storing the recreational vehicle outside, place a cover over the rig to help keep it clean and dry. Commercially manufactured custom-fit covers made of lightweight, breathable materials are designed to resist the sun’s damaging ultraviolet rays while preventing moisture that can lead to the growth of mildew and mold. A standard tarpaulin (common blue tarp found at most discount stores) shouldn’t be used because it can trap moisture and may damage the exterior surface, especially body paint.
If you can only park under a canopy or carport, you may want to enlist the use of a cover to protect the RV from bird droppings and other airborne elements.
When using a cover, leave one or two of your roof vents cracked open to promote the exchange of air. If storing outside, protect air-conditioner units with covers designed for that purpose.
RV Storage, Inside-Out
Like the exterior, the inside of a recreational vehicle being readied for winter storage should be thoroughly cleaned. Defrost, clean and dry the inside of the refrigerator–freezer. Place a container of baking soda inside the fridge (and one in the freezer compartment) to absorb odor, secure the doors open and leave the unit and all other appliances turned off and, if possible, unplugged.
Close the windows and draw the shades. If storing your RV outside without a cover, consider placing insulated, reflective sunshades in the windows. Retract the slide-outs.
Condensation can be a big problem, especially for RVs stored in humid climates. Use a dehumidifier to remove harmful moisture from the rig’s interior. You can use a power-free product like Dri-Z-Air moisture-absorbing crystals or, if an outlet is available in storage, one of the dehumidifiers that operates on 120-volt AC power.
Before closing up, make a list of the items that remain. Photograph the interior and exterior of the rig; the inventory and photos will come in handy if your RV is burglarized or damaged while in storage.
Fluids, Fuels and Power Sources
The term “winterize” is often interpreted as simply draining water lines and holding tanks and adding RV antifreeze. These tasks are required regardless of the type of RV.
For basic winterizing, drain and flush the black- and gray-water tanks. Next, drain the freshwater system, including the water heater and icemaker feed. Most RVs have low-point drain valves for the water lines, and water heaters have a standard drain plug, which should be left out during storage. Opening faucets aids the draining process.
If you live in an area where the temperature dips below freezing, you’ll need to bypass the water heater if using non-toxic antifreeze. This is done via a water-heater bypass mechanism. Some RVs are equipped with a bypass valve from the factory, making this task as simple as rotating a handle. For the many RVs that don’t, bypass kits are available at RV-supply stores. Installation is relatively easy.
Protecting the RV’s water system with nontoxic antifreeze requires pumping in 2 to 6 gallons of the fluid. Never use automotive antifreeze. This is usually accomplished by using a bypass hose from the inlet of the water pump that’s inserted into the antifreeze container. Turning on the pump and opening one faucet at time will route the antifreeze through the system. Make sure you also protect the toilet and the washer–dryer, if the rig is so equipped.
Another way to protect the system is to purge the freshwater using compressed air. In this case, an air-blowout adapter (using a Schrader valve) is screwed into the city-water hookup fitting so compressed air (with pressure at 45 psi or lower) is routed into the system. As the air is fed into the lines—which can be done solo using a clamp-on air chuck—each faucet is opened individually (hot and cold sides) until all the water is purged.
In addition, you should pour a cup or two of nontoxic antifreeze down each drain to keep the P-traps from freezing.
Winterizing an RV’s water system isn’t difficult, but it does take time. Therefore, many RVers have this work performed by professionals at an RV-service facility.
Batteries also require your attention. Make sure they’re topped off with distilled water and thoroughly cleaned. Turn of all power draws. It’s best to use a battery cut-off switch. One can be easily added if such a switch wasn’t provided by the factory.
Most experts recommend removing the RV’s batteries if the rig is stored in freezing temperatures. Battery condition should be checked monthly and re-charged as needed.
To prepare the RV’s propane system, make sure the main valve on the tank or valves on the cylinders are shut off.
Motorized RVs require an additional level of winterization. Prior to storage, owners should perform standard engine service, including changing the oil and filters, and lubricating the chassis. Add fuel stabilizer, then fill the fuel tank and run the engine and AC generator for a few minutes to ensure that the stabilized fuel circulates fully.
If you’re storing the motorhome in extreme temperatures, make sure you’re using windshield-washer fluid that won’t freeze.
Keep Pests Where They Belong
As snowbirds begin the journey to warmer climes, critters and insects begin looking for winter homes, and your unoccupied RV will appear quite alluring. There’s no surefire way to bar pest entry into your RV, but you might try combining a few simple remedies.
Begin by restricting access into your vehicle. Inspect the underside of the unit for openings big enough to accommodate your pinkie or larger, and fill the apertures with steel and/or aluminum wool, or consider using expanding insulation, if the application makes sense.
Fabric-softener sheets, which emit scents that pests can’t stand, are unlikely but effective weapons against invasion. Place a sheet anywhere you think a critter might launch an entry attempt. That includes stuffing a couple beneath each tire and in vent openings. There are also a number of commercial products on the market that help deter uninvited pests. These are usually available at farm-supply stores.
A Tin Cat mousetrap, available in hardware stores, can be placed adjacent to each tire. This device has helped many RVers keep mice from using the wheels as footholds for entry. It’s a small investment to protect your RV from these harmful pests.
You should guard against smaller pests, like ants, as well. Many people find that ringing each of their RV’s tires with Comet cleanser protects against an ant invasion. Several commercial products on the market work in a fashion similar to Comet.
If pest prevention seems like a hassle, remember that it’s much easier to hamper the intrusion of unwanted guests than it is to convince them to depart in the spring.